Category: Tutorials

Sometimes its good to know how to do something!

  • iPod Video to iPod Touch (How To)

    iPod Video to iPod Touch (How To)Back in October, I had published a post on how to hack your ipod video to make it look like an ipod classic.

    Well, given that there’s been a new firmware release from the same group that published the Classic firmware I figured I may get to testing the new iPod Touch interface for the iPod video.

    Don’t go getting excited – it’s not going to turn your iPod video into a touchscreen interface, but it will give you a rather impressive new interface for your iPod video.

    Note that I had previously been using an early release of the iPod classic firmware, iTunes clearing that on me last night to install Apple’s 1.2.3 release for the 5G iPod, which I’ve overwritten with the new iPod Touch firmware release (built on 1.2.1).

    Update: Almost 12 months on, I’ve stopped using my own video iPod and haven’t attempted this upgrade since I first made the post, I’m now happily using an actual iPod Touch. Note that as with any software or firmware upgrades or installs, you also accept responsibility for your actions and following the steps. I can’t and won’t guarantee that it will work for you as it’s been a while since I attempted it myself. I don’t accept iPods via mail to change firmware and I don’t accept responsibility for your own iPod when you’re making changes.

    Remember, if you get stuck, you can do the iPod reset as outlined in the older post.

    Prepping For The Install

    As with the previous hack, you’ll need to get yourself a copy of of the latest version of iPodWizard. You’ll also need access to a windows machine (XP / Vista), the correct firmware version for your iPod (5G firmware | 5.5G firmware) and an iPod cable.

    How To Update Your iPod Video Firmware

    • Before plugging in your iPod access the main menu settings by going to Settings > Main Menu when you turn your iPod on. Make sure the only menus switched on are ‘Music’, ‘Photos’, ‘Videos’ and ‘Extras’, everything else can be switched off. This will ensure there are no broken links or errors in navigating your iPod from the main screen.
    • Connect iPod to PC (iPod Wizard is windows based). If iTunes opens on connecting, you’ll need to close it and make sure that nothing else is accessing your iPod at the time. If connected properly, you will see the ‘Do Not Disconnect’ warning on your iPod screen.
    • Browse (via My Computer) to your downloaded firmware and if zipped, unzip it to a new folder. I named my folder 5G iPod Touch Hack.
    • In iPod Wizard, set your edit mode (top left corner) to ‘Firmware File’.
    • Click the ‘Open Firmware’ button and navigate to your ‘5G iPod Touch Hack’ folder and open the ‘TouchHack2.0’ file (Windows displays the default icon if no filetype associated, it has a .bin extension). Once loaded, the firmware’s version name will appear beside the ‘open firmware button’.
    • Click ‘Write To iPod’ to start copying the firmware onto your iPod. This doesn’t have any impact on your music collection, everything remains intact. The write process can take anywhere from 30 seconds to 2 minutes.
    • Once written, press ‘Eject’ in iPod Wizard. You should hear the Windows sound (if your speakers are on) for the removable drive disconnecting. DON’T unplug your iPod. Your iPod will restart and begin loading the new firmware for the first time.
    • When your iPod has fully restarted, press ‘Eject’ again in iPod Wizard. This will disconnect your iPod from your PC at which time you can remove the cable and start exploring your new interface.

    Before & After Images

    iPod Touch Hack - Click for more images

    A full range of images can be found here on Flickr.

    The firmware update was released by DrivenDesign.

  • Unmountable Boot Volume (Dell, Fix)

    Unmountable Boot Volume (Dell, Fix)

    Recovery Console

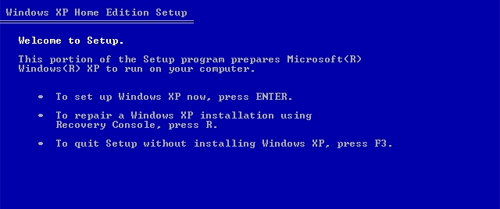
    So you’re using your Dell laptop (in this case a Dell Inspiron 1501 running Windows XP Professional) with no problems, turn it on one day and you get that gorgeous blue screen of death telling you that you’ve an unmountable boot volume. You call Dell support and they take you through diagnostic tests, get you to boot in safe mode (which won’t work by the way) and then they tell you to launch the recovery console or reinstall Windows.

    Reinstall? No sirree!

    Getting around this problem today (see previous post) here’s what I did (not my laptop as the MacBook Pro doesn’t throw up those kind of errors)…

    • With the laptop on the blue screen, grab your Windows XP CD (might be branded as a Dell Reinstallation CD), pop it into the CD drive and reboot the laptop.
    • When prompted, press any key to boot from CD, allowing a minute or so for drivers to load in the background.
    • From the first menu you see, press ‘R’ to launch the recovery console. This will launch a dos-prompt driven recovery console allowing some basic disk commands.
    • Enter your first command: “chkdsk /r” (give about 20-30 minutes to run).
    • When completed, follow up with “chkdsk /p” (give about 2 minutes to run).
    • Finally, follow up with “fixboot c:”. This will quickly test the boot sector and prompt you to write a new one. It is likely that the boot sector on your drive has become corrupt, once you agree to write a new bootsector, allow a half minute or so for the task to run until prompted with a success message.
    • Type ‘EXIT’ to quit the recovery console and restart the laptop.

    That… should be that. It helps to have the original Dell XP disc though. A standalone version wouldn’t display the recovery console menu on launch but the Dell OEM version does (purple coloured CD including Service Pack 1a – it’s been a while). Of course, if the disc doesn’t boot when you restart the computer it may be possible that you’re BIOS is looking to the hard drive before the CD. In that case you’ll need to enter the Dell BIOS (pressing F2 for setup on immediate restart). See here (Dell support) for specific details.

  • Photoshop & Design Resources For Students

    The following are a list of resources for Photoshop for students or anyone looking to get into Adobe Photoshop. Blog post stemmed from conversation with Tanya, a first year multimedia student in Tipperary Institute (part of Bernie Goldbach‘s group, a lot of whom I met in Kilkenny earlier this week). These resources would have been fantastic when we were coming through college back with Photoshop 5/6/7.

    • BA Magazine – Before & After Magazine to which we hold an office subscription. BA gives you downloadable PDF guides on various techniques for design, a lot of which are related to Photoshop use. If you can grab a free download – take a look, you won’t be disappointed.
    • Photoshop TV – ‘The Photoshop Guys’ have now published over 70 episodes (video) looking at everything from Photoshop filters to the individual tools, lighting techniques, colour techniques, use of layers, masking, gradients, 3D imagery and more.
    • Photoshop Podcast Directory – Directory listing of various Photoshop podcast. Some of which “are fairly annoying”, some of which are fairly good.
    • Photoshop Online Video Podcast – Photoshop tips and techniques by Photoshop author and trainer Jan Kabili. You can subscribe on iTunes to this podcast which as been running from August 2006.
    • Tutorial Blogs – Free Photoshop tutorials since 2006, looking at the use of the Pen tool (important one for students if you’re crossing between Photoshop and Illustrator), Photoshop brushes and more.
    • Lynda.com – You’ve got to pay for the access, $25 a month, but they do premium learning resources for Photoshop and almost every other multimedia application going. Get a lecturer to spring for the resource access, I’ve seen some of the tutorials and they’re top quality.
    • Photoshop Beginners Tips (Jennifer Apple) – Some quick and easy tips, keyboard shortcuts and the like for Photoshop from Jennifer Apple (also part of the PhotoshopSupport.com site)

    Additions:

  • Free CSS Tutorials (Beginners & Advanced)

    If you’ve ever wanted to learn how to effectively use stylesheets to manage the layout of a web page then head over to Johnnypez.com. John is back in the blogging game (apart from Roaddeaths.ie that is) and has started off with a beginners guide to CSS layouts, followed up with an advanced guide.

    Tip – the three letters stand for ‘cascading stylesheets’ 🙂

  • 90% Of Email Now Spam

    Its me Jamie.

    Its me Lynette.

    Its me Justin.

    I’m getting sick and tired of these emails, the latest wave of junk mail passing through the office at the moment. Simple emails with random names after “its me” in the subject line just to add to my morning woes of clearing out the junk mail. Then again, these are just the latest addition to the high amounts of spam we already have to filter through.

    According to Digital Lifestyles now, the internet is truely under siege with “just over 90%” of email now junk mail. Figures estimate that the level of spam circling online has almost trebled from 2.5 billion mails in June to around 7 billion mails in November, still with a week left in the month.

    Thats some size of an increase over such a short period (5 months give or take), even with new spam legislation in place.

    Site Developer has a handy spam tutorial for users of Outlook, without delving into any additional software (though I know the source of the bulk of our spam and I’ll be putting an end to it within the next month) which is available here.

    While there are loads of commercial options available for beating spam, HelpYourself.ie (Aidan and Keith’s monthly talk) points to K9 as a free application to help you beat spam out of your inbox.

    Now, where did I leave my own spam beating stick?

  • Help Yourself With Email

    The next Help Yourself session kicks off at 6pm this Wednesday in Harry’s Bar in Langtons and runs for an hour. Guest speaker on the night will be head of marketing and sales for the Hibernian Hotel, Michael Reuter, who will be speaking on the benefits of the Hibernian’s mailing list and lessons they have learned from using their mailing list.

    Keith
    will also be looking at email in general with some tips on the “do’s and don’ts” of email, email etiquette, attachments, spam etc.

    Check out more at HelpYourself.ie

    Note to Michele…. consider yourself reminded 😉

  • How To Manually Update Your Nameservers

    This post is targetted at anyone who has had difficulty or continues to have difficulty with Eircom viewing certain websites. In my case, it relates to domains registered from May of this year onwards. While you can wait a few days for Eircom to get their nameservers in gear or let them refresh, here’s a quick fix for you.

    1. Open your network connections in windows, right-click on whatever connection you use for your broadband (be it wireless or ethernet) and click properties
    2. In your connection properties window (which pops up), scroll down the main list of items your connection uses to find ‘Internet Protocol (TCP/IP)’
    3. Under the ‘General’ tab, skip to the second box and tick the radio button for ‘Use the following DNS server addresses
    4. Set your Primary DNS address to 159.134.237.6 and your Alternative DNS to 159.134.248.17. Please note that these are EIRCOM DNS server addresses
    5. OK your changes in this window, and OK your changes in your network connections window and hopefully, like me, you’ll find that the sites are now appearing for you!

    Bloody pain in the arse, and took me a while to find the old nameservers but at least I’ve got access to the sites I’ve needed anyway. For anyone who is interested, the current Eircom nameservers are

    • 213.94.190.194
    • 213.94.190.236

    but they don’t seem to be refreshing all that well of late! This will impact the name servers on your machine locally, and doesn’t change any settings on your router (as the Eircom router automatically picks up the new 213* address range). You can follow this tutorial if you are not an Eircom customer and need to make local changes to your Primary / Alternative DNS anyway.

    To reverse the changes, go back to your network properties screen again via the steps above, go back to your TCP/IP properties and just tick ‘Obtain a DNS server address automatically’ and you’ll be back to square one.

  • The Blogger’s Glossary

    Ever wonder what people are babbling on about? Permalinks, trackbacks, pings, autocasting, vlogging, xml, opml, rss… endless phrases, acronyms, and words that we’ve become so used to on a daily basis.

    Well, if you do wonder about them, wonder no more thanks to Quick Online Tips’ Giant Blog Glossary. Useful resource if you’re teaching someone about blogging!

  • Geotagging Kenmc.com

    For those of you interested, here’s a good web tutorial on Geotagging, particularly handy when it comes to your blog as you can indentify the content of your blog to a specific country, or region, including your RSS feeds. It’s been around a small age already on the web and I have it active on DeviantART to check nearby Deviants, so now I can check nearby bloggers I suppose!

    The site I was using was FeedMap (because blogs + maps = feedmap, isn’t it obvious?), still in beta as is most web 2.0 stuff floating around the web. Its a handy too to see who’s floating around your area.

    If you’re interested, and using WordPress, you can insert the following code into your header.php which will geotag your website…

    meta name="ICBM" content="52.6442, -7.2395"
    meta name="geo.position" content="52.6442;-7.2395"

    Then to tag my RSS feeds, I simply added the following lines between the before the last line of wp-rdf.php


    geo:Point
    geo:lat 52.6442 /geo:lat
    geo:long>-7.2395 /geo:long
    /geo:Point

    (Don’t forget that you have to open and close your tags…. the icbm tags are coupled with the longitude and latitude namespaces)

    Those locations will most likely stick you on the Dublin Road, just about at my office, only a stonesthrow from home anyway…

    If that doesn’t make any sense to you at all the I suggest reading this tutorial on making your site and RSS feed locatable!

    —–
    Followup…. if you’re feeling lazy… sign up to feedburner and you can geotag your RSS feed straight from there!

  • PageRank Followup

    Having been speaking about Google PageRank last week, I came across this paper which should be of interest to those of you worried about how your site or blog is performing. It is a quite detailed breakdown of how the PageRank algorithm works and what it does. The paper was written by Ian Rogers and is certainly worth reading for anyone with an interest in the workings of that elaborate ranking scheme.

  • Connecting People Together

    Dux Computer Digest provides a great tutorial on making your own network cables, whether patch or crossover.

    It is often the little things we overlook. Stepping through the tutorial was a breeze and the cable was cut and put together in about 2 minutes or less. Mind you, since I knew what I was doing already I had the upperhand. But you can’t fault a good tutorial.

    It provides an introduction as to why we use cables and what kind of cable you need (whether you’re going PC to PC or PC to Hub etc), followed by a little history, a little theory, and with the greatest of large colour diagrams it moves on to “Lets Make Cables” while guiding you through where to make cuts, the tools you need for the job and all the rest.

    What I would suggest though is that if you are making your own cables (I’m making a bunch to allow me use the XBOX and PC on broadband at home), get cables that are clearly marked (colours and stripes) and make sure you leave yourself a little slack to allow some room to move.

    Good tutorial though….